OpenGL Image Format
The OpenGL function glDrawPixels, renders
images. Chapter 8 the "Red Book" and the OpenGL
Reference Manual (also called the "Blue Book";
see the bibliography) both provide information on
glDrawPixels.
The prototype for glDrawPixels is as
follows:
glDrawPixels( GLsizei width,
              GLsizei height,
              GLenum format,
              Glenum type,
              const GLvoid *pixels) ;
The first two parameters specify the width and
height of the image, in pixels. The last parameter
is a pointer to the pixel data itself. The other two
parameters, format and type, tell
glDrawPixels how to interpret the data that the
pixels parameter points to.
The format parameter specifies the
composition of each element in the image. It can
have the following values:
- GL_RGB
- GL_RGBA
- GL_COLOR_INDEX
- GL_STENCIL_INDEX
- GL_DEPTH_COMPONENT
- GL_RED
- GL_GREEN
- GL_BLUE
- GL_ALPHA
- GL_LUMINANCE
- GL_LUMINANCE_ALPHA
GL_RGB and GL_RGBA, are of greatest interest to
me now because these parameters follow the formats
used by Microsoft Windows.
The type parameter can have the
following values:
- GL_UNSIGNED_BYTE
- GL_BYTE
- GL_BITMAP
- GL_UNSIGNED_SHORT
- GL_SHORT
- GL_UNSIGNED_INT
- GL_INT
- GL_FLOAT
Windows uses GL_UNSIGNED_BYTE for its DIBs.
Consider an example:
glRasterPos3d(x, y, z) ;
glDrawPixels(cx, cy, GL_RGB, GL_UNSIGNED_BYTE, pPixels) ;
OpenGL draws the image stored at pPixels
at the coordinate (x, y, z).
The void* pPixels
variable points to RGB triples stored as three
unsigned bytes. Figure 1 summarizes what we learned
about the image format by studying glDrawPixels.
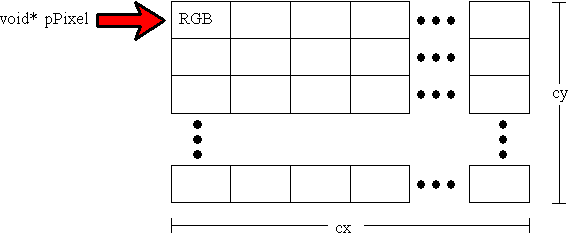
Figure 1. OpenGL image format
The following example is slightly different from
our previous example:
glRasterPos3d(x, y, z) ;
glDrawPixels(cx, cy, GL_RGBA, GL_UNSIGNED_BYTE, pPixels) ;
Instead of storing RGB triples, the GL_RGBA
format parameter specifies that each pixel is made
up of four unsigned bytes—one byte each for the red,
green, blue, and alpha components.
Although examining glDrawPixels does
provide us with some insight into how OpenGL stores
images, we still need to answer some questions, such
as how the pixels are stored in memory.
glPixelStore
The glPixelStore command controls how
pixels are stored in, and read from, memory.
"Pack" refers to putting images in memory, and the
term "unpack" refers to reading images from memory
and putting them on the screen. We want to translate
a Windows DIB into a format that OpenGL can unpack
and display on the screen. Therefore, our interest
lies only in the unpacking functionality of
glPixelStore.
glPixelStore controls six OpenGL
parameters that affect unpacking images. The
following table (based on the table in Chapter 8 of
the Red Book) lists these parameters:
|
Parameter Name |
Type |
Initial Value |
Valid Range |
| GL_UNPACK_
SWAP_BYTES |
GLboolean |
FALSE |
TRUE/FALSE |
|
GL_UNPACK_LSB_FIRST |
GLboolean |
FALSE |
TRUE/FALSE |
|
GL_UNPACK_ROW_LENGTH |
GLint |
0 |
i > 0 |
|
GL_UNPACK_SKIP_ROWS |
GLint |
0 |
i > 0 |
|
GL_UNPACK_SKIP_PIXELS |
GLint |
0 |
I > 0 |
|
GL_UNPACK_ALIGNMENT |
GLint |
4 |
1, 2, 4, 8 |
The GL_UNPACK_SWAP_BYTES parameter is needed only
when transferring images between systems that order
bytes differently. We can ignore this parameter
because we are using the DIBs on a Microsoft Windows
system.
GL_UNPACK_LSB_FIRST is used only with
1-bit-per-pixel (bpp) images, which we'll hope we
don't need.
The next three parameters, GL_UNPACK_ROW_LENGTH,
GL_UNPACK_SKIP_ROWS, and GL_UNPACK_SKIP_PIXELS, are
used to display a piece of a larger image, which
we'l also hope not to need.
This leaves us with one measly flag,
GL_UNPACK_ALIGNMENT, which controls the alignment of
pixel rows. The following table shows the allowable
values for GL_UNPACK_ALIGNMENT and their meanings:
|
Value |
Meaning |
| 1 |
Byte alignment
(that is, no alignment) |
| 2 |
Row alignment
to even-numbered bytes |
| 4 |
Word alignment |
| 8 |
Double-word
alignment |
GL_UNPACK_ALIGNMENT will pad the end of a row
with enough bytes to start the next row on the
proper boundary.
It's amazing that the Red Book does not mention
the ordering of the RGB triple in memory. As
mentioned in the Blue Book, red is always stored
first, followed by green, and then blue. This order
cannot be modified with glPixelStore. Figure
4 summarizes what we learned about the image format
by studying glPixelStore.
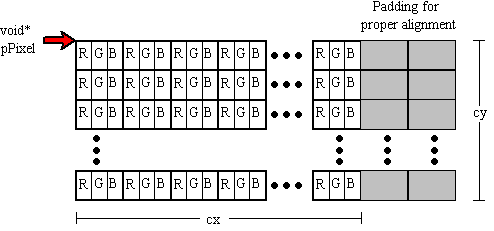
Figure 4. Storage of an OpenGL
image
From the discussion above, we can see that an
OpenGL image is a chunk of memory with a certain
format, type, alignment, width, and height. Pretty
simple, really.
For more information, see the section "Storing,
Transforming, and Mapping Pixels" in Chapter 8 of
the Red Book.
Windows DIB Format
Like OpenGL, Windows DIB in that it also consists
of a chunk of memory in a specific format--but
Window DIB formats vary quite a bit: 1-, 4-, 8-,
16-, 24-, and 32-bpp formats with a variety of
compression types. Worse: Win32® has no
functions for loading DIBs and very few functions to
help you use DIBs, (See the bibliography at the end
for a listing of sources on this. Dale
Rogerson, whose
article I'm relying on heavily here, recommends
Nigel Thompson's book Animation Techniques for
Win32 (available from Microsoft Press®) and
Nigel's CDIB class to read Windows DIBs.
Storage of RGB components in DIB is reversed to
BGR and the rows of the DIB are DWORD-aligned
in a Windows DIB. Figure 2 shows the format of a
Windows DIB.
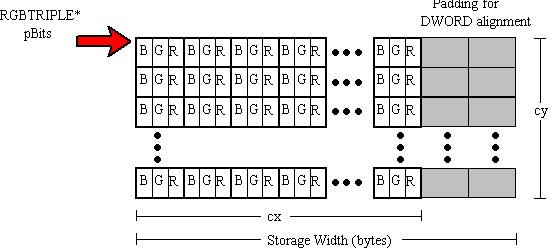
Figure 2. 24-bpp DIB format
Loading a DIB
The CDIB class from
Nigel's animation library CDIB class has
a very convenient Load member function that
takes a filename and loads the file. Here is the
code from GLlib that loads a Windows DIB and starts
the translation process:
void
CGLImage::Load(LPCTSTR filename,
TRANSLATEMETHOD enumMethod)
{
//
// Is an image already loaded?
//
if (m_pBits) {
// Clean up previous image.
free(m_pBits );
m_pBits = NULL ;
m_iHeight = 0 ;
m_iWidth = 0 ;
}
//
// Create a DIB using Nigel's animation library.
//
CDIB aDib ;
aDib.Load(filename) ;
// Get width and height in pixels.
m_iWidth = aDib.GetWidth() ;
m_iHeight = aDib.GetHeight() ;
//
// Create a palette from the colors in the DIB.
//
CDIBPal aPalSrc ;
aPalSrc.Create(&aDib) ;
//
// Translate using one of three methods.
//
m_enumMethod = enumMethod;
switch(m_enumMethod)
{
case TRANS_GDI:
m_PixelFormat = GL_RGBA ;
TranslateByGDI(aDib, aPalSrc) ;
break;
case TRANS_BOTH:
m_PixelFormat = GL_RGB ;
TranslateByBoth(aDib, aPalSrc) ;
break;
case TRANS_DIY:
default:
m_PixelFormat = GL_RGB ;
TranslateByYourself(aDib, aPalSrc) ;
}
} |
Nigel's CDIBPal class conveniently creates
a palette from a CDIB object's color table,
which can really simplify this part of the code.
Translation
Here are three methods for translating the
Windows DIB to a format usable by OpenGL. In the
first, we write all the translation code ourselves.
In the second method, we use the graphics device
interface (GDI) to do the work. In the last method,
we use GDI to do part of the translation and provide
some extra code to finish the work. The translation
methods are called from CGLImage::Load in
GLlib, as listed above.
Do-It-Yourself Method
Here we write all the code that translates a DIB
to an OpenGL image. Because we write the code, we
know exactly what the translation process is. The
disadvantage of this method is that a DIB can have
many different formats, all of which the translation
code must handle. The source code in
CGLImage::TranslateByYourself handles 4-, 8-,
and 24-bpp DIBs. The rest are left as an exercise
for the student.
CGLImage::TranslateByYourself converts
Windows DIBs to an array of 24-bpp structures (CGLRGBTRIPLE)
with no padding. A skeleton of
TranslateByYourself is shown below. The details
of the actual translation are given later in this
section.
int
nBitsPerPix = aDib.GetBitsPerPixel() ;
void* pBits
= aDib.GetBitsAddress() ;
int
storageWidth = aDib.GetStorageWidth() ;
// storage width in BYTES!
CGLRGBTRIPLE* pGLRGB =
(CGLRGBTRIPLE*)malloc(m_iWidth*m_iHeight*sizeof(CGLRGBTRIPLE));
CGLRGBTRIPLE* pDest = pGLRGB ;
switch(nBitsPerPixel)
{
case 24:
.
.
.
break ;
case 8:
.
.
.
break ;
.
.
.
} |
The image is rendered with the OpenGL command:
glPixelStorei(GL_UNPACK_ALIGNMENT, 1) ;
glDrawPixels(m_iWidth, m_iHeight, GL_RGB, GL_UNSIGNED_BYTE, m_pBits) ;
glPixelStore turns padding off. The call
to glDrawPixels uses the GL_RGB pixel format
to specify a 24-bpp format for the memory that
m_pBits points to.
As I mentioned above,
CGLImage::TranslateByYourself creates a new
chunk of memory consisting of CGLRGBTRIPLE
structures, which are defined in IMAGE.CPP as
follows:
typedef struct _CGLRGBTRIPLE {
   BYTE rgbRed ;
   BYTE rgbGreen ;
   BYTE rgbBlue ;
} CGLRGBTRIPLE ;
The placement of the red and blue color
components in this structure differs from the
placement of components in the Windows RGBTRIPLE
structure. Windows places the blue color component
first in memory, whereas OpenGL looks for the red
color component first.
typedef struct _RGBTRIPLE { //rgbt
   BYTE rgbtBlue ;
   BYTE rgbtGreen ;
   BYTE rgbtRed ;
} RGBTRIPLE ;
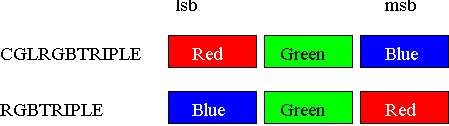
Figure 3. Ordering of color
components in memory
24-bpp DIBs
The conversion of 24-bpp Windows DIBs to OpenGL
images consists of
- removing the boundary padding and
- rearranging the bits from an RGBTRIPLE
format to the CGLRGBTRIPLE format:
.
.
.
int storageWidth = aDib.GetStorageWidth()
; // storage width
in BYTES!
CGLRGBTRIPLE* pDest = pGLRGB ;
.
.
.
case 24:
{
RGBTRIPLE* pSrc = (RGBTRIPLE*)
pBits ;
int widthDiff = storageWidth -
m_iWidth*sizeof(RGBTRIPLE) ;
for(int j = 0 ; j < m_iHeight ;
j++)
{
for(int i = 0
; i < m_iWidth ; i++)
{
pDest->rgbRed = pSrc->rgbtRed ;
pDest->rgbGreen = pSrc->rgbtGreen ;
pDest->rgbBlue = pSrc->rgbtBlue ;
pDest++ ;
pSrc++ ;
}
pSrc = (RGBTRIPLE*)(
(BYTE*)pSrc + widthDiff) ;
}
}
break ;
|
The storageWidth
variable contains the actual width (in bytes) of the
DIB in memory, including padding.
storageWidthis used
to remove the padding at the end of the DIB.
8-bpp DIBs
Unlike the 24-bpp DIB format, the 8-bpp DIB
format uses a color table. Nigel's CDIB class
contains the GetClrTabAddress function, which
returns a pointer to the DIB's color table.
Translating the 8-bpp DIB into a form usable by
OpenGL consists of looking up the color of each
pixel and inserting this color into the destination
image. The color is converted from an RGBQUAD
into a CGLRGBTRIPLE, and padding is removed
in the process.
case 8:
{
BYTE* pSrc = (BYTE*) pBits ;
RGBQUAD* pClrTab =
aDib.GetClrTabAddress() ;
int widthDiff = storageWidth -
m_iWidth ;
for(int j = 0 ; j < m_iHeight ;
j++)
{
for(int i = 0
; i < m_iWidth ; i++)
{
pDest->rgbRed = pClrTab[*pSrc].rgbRed ;
pDest->rgbGreen = pClrTab[*pSrc].rgbGreen
;
pDest->rgbBlue = pClrTab[*pSrc].rgbBlue
;
pDest++ ;
pSrc++ ;
}
pSrc +=
widthDiff ;
}
}
break ; |
4-bpp DIBs and other formats
The code for translating 4-bpp DIBs is included
in CGLImage::TranslateByYourself. You have
enough information to write the remaining formats
yourself.
GDI Method
The GDI method uses the Win32 StretchDIBits
function to perform the translation. This method
creates a DIB section in a format that OpenGL can
use, and the original DIB is drawn on the new DIB
section with StretchDIBits. We then pass the
pointer to the bits to OpenGL, so it can render the
picture.
The challenge of this method is trying to find
the overlap between the set of formats that
StretchDIBits supports and the set that OpenGL
supports. The difficulty lies in the order of the
color components in memory. Again, Windows puts blue
first while OpenGL puts red first.
32-bpp DIBs come to the rescue! Based on the
theory that more is better, the Windows DIB
specification was extended to include 16- and 32-bpp
formats. Although these additions do not directly
improve life (try finding any 16- or 32-bpp DIBs),
the extension to the DIB specification does help us
rearrange the color components.
BI_BITFIELDS
We can customize the byte ordering with 16- or
32-bpp DIBs. To customize, set
BITMAPINFOHEADER.biCompression to BI_BITFIELDS,
and then supply three DWORDs (or RGBQUADs)
containing masks that determine the pixel layout.
The first DWORD contains the red mask, the
second DWORD contains the green mask, and the
third DWORD contains the blue mask. Using
RGBQUADs instead of DWORDs can make the
reversal of bytes more obvious in our case:
BITMAPINFO*
pBMI ;
.
.
.
// Red mask moves
the red byte into blue's normal
position.
pBMI->bmiColors[0].rgbBlue = 0xff ;
// Green mask
doesn't move location of green byte.
pBMI->bmiColors[1].rgbGreen = 0xff ;
// Blue mask moves
the blue byte into red's normal
position.
pBMI->bmiColors[2].rgbRed = 0xff ; |
See "Formats Using BI_BITFIELDS and Color Masks"
in the "Bitmap Format Extensions" section of the
Video for Windows SDK (in Product Documentation,
SDKs, Win32 SDK for Windows 3.5) for more
information on BI_BITFIELDS.
To use the byte reordering feature of
BI_BITFIELDS, we must use 32-bpp DIBs. To get OpenGL
to display a 32-bpp DIB instead of a 24-bpp DIB, we
must use GL_RGBA instead of GL_RGB as a format
specifier:
glPixelStorei(GL_UNPACK_ALIGNMENT, 1) ;
glDrawPixels(m_iWidth, m_iHeight, GL_RGBA, GL_UNSIGNED_BYTE, m_pBits) ;
This approach wastes one byte per pixel. It also
assumes that the driver will place a zero in the
fourth location, which becomes the alpha component
in OpenGL.
Another problem with this method is that it works
only in Windows NT™. In Windows 95,
CreateDIBSection will create an arbitrary format
with BI_BITFIELDS, but the other GDI calls (for
example, BitBlt) will only support a subset
of the possible BI_BITFIELD masks. For 32-bpp DIBs,
the GDI calls will only support 8-8-8 BGR with
BI_BITFIELDS.
CGLImage::TranslateByGDI
The code for translating a Windows DIB into an
OpenGL image using GDI is shown below. The code
creates a new 32-bpp DIB section and uses the
BI_BITFIELDS style to customize the color component
arrangement in memory. It then draws the Windows DIB
in the new DIB section using the CDIB::Draw
from Nigel's animation library. The resulting image
is in a format that OpenGL can use.
void
CGLImage::TranslateByGDI(CDIB& aDib,
CDIBPal& aPalSrc)
{
//
// Allocate memory for new DIB section header. Include
// room for 3 color masks. BITMAPINFO includes one RGBQUAD.
//
int iSize = sizeof(BITMAPINFO) + 2 * sizeof(RGBQUAD);
BITMAPINFO* pBMI = (BITMAPINFO*) malloc(iSize);
memset(pBMI, 0, iSize);
// Fill in the header info.
pBMI->bmiHeader.biSize
= sizeof(BITMAPINFOHEADER);
pBMI->bmiHeader.biWidth =
m_iWidth;
pBMI->bmiHeader.biHeight =
m_iHeight;
pBMI->bmiHeader.biPlanes = 1;
pBMI->bmiHeader.biBitCount = 32 ;
// Must use 32 bpps
pBMI->bmiHeader.biCompression = BI_BITFIELDS ; // to use this
flag.
//
// Rearrange RGB component storage from BGR to RGB.
//
pBMI->bmiColors[0].rgbBlue = 0xff ; //
Store red in blue's position.
pBMI->bmiColors[1].rgbGreen = 0xff ; // Green
stays the same.
pBMI->bmiColors[2].rgbRed = 0xff ;
// Store blue in
red's position.
//
// Create the new 32-bpp DIB section.
//
CDC dc;
dc.CreateCompatibleDC(NULL);
BYTE* pBits ;
HBITMAP hbmBuffer = CreateDIBSection( dc.GetSafeHdc(),
pBMI,
DIB_RGB_COLORS,
(VOID **) &pBits,
NULL,
0);
// Select DIB into DC.
HBITMAP hbmOld = (HBITMAP)::SelectObject(dc.GetSafeHdc(), hbmBuffer);
// Blt the Windows DIB into our new DIB.
dc.SelectPalette(&aPalSrc,0) ;
dc.RealizePalette() ;
aDib.Draw(&dc,0,0) ; // Use Nigel's Animation class.
GdiFlush() ;
//
// Copy the bits out of the DIB section. This allows us to delete
// the DIB section since we don't need it. It's possible to keep
// the DIB section around and use pBits directly.
//
int iImageSize = m_iWidth * m_iHeight * sizeof(RGBQUAD) ;
m_pBits = malloc(iImageSize) ;
memcpy(m_pBits, pBits, iImageSize) ;
//
// Get rid of all the GDI stuff.
//
if (hbmOld)
(HBITMAP)::SelectObject(dc.GetSafeHdc(),
hbmOld);
DeleteObject(hbmBuffer) ;
} |
In the code above, the bits out of the DIB
section are copied into a new chunk of memory, and
then deleted. This step makes
TranslateByGDI more like TranslateByYourself,
resulting in a much simpler class for demonstration
purposes. However, this step is not necessary; it
wastes time, especially when dealing with large
images.
You can change CGLImage so it only uses
TranslateByGDI, and then pass the pBits
pointer returned by the CreateDIBSection call
to glDrawPixels. Then you don't have to waste
time copying the image again.
Partial GDI Method
The last method here is the favorite of
Dale Rogerson. It combines the
do-it-yourself method and the GDI method in one
nice, clean method. Use the GDI to translate the
bitmap from its original format to a 32-bpp format.
Using 32 bpp instead of 24 bpp means that I don't
have to worry about boundary padding. Then write
code to rearrange the bytes from 32-bpp BGR ordering
to 24-bit RGB ordering.
This method has three major advantages: It
doesn't rely on BI_BITFIELDS, it doesn't waste any
bytes of memory, and it will run in Windows 95. We
use the same command for rendering the image that we
used in the do-it-yourself method:
glPixelStorei(GL_UNPACK_ALIGNMENT, 1) ;
glDrawPixels(m_iWidth, m_iHeight, GL_RGB,
GL_UNSIGNED_BYTE, m_pBits) ; |
The code for CGLImage::TranslateByBoth is
given below:
void CGLImage::TranslateByBoth(CDIB& aDib, CDIBPal& aPalSrc)
{
   //
   // Allocate memory for new DIB section.
   // No color table is needed.
   //
   const int BITMAPINFOHEADER_SIZE = sizeof(BITMAPINFOHEADER) ;
   BYTE* abBitmapInfo[BITMAPINFOHEADER_SIZE] ;
   BITMAPINFOHEADER* pBMIH = (BITMAPINFOHEADER*)abBitmapInfo;
   memset(pBMIH, 0, BITMAPINFOHEADER_SIZE);

   // Fill in the header info.
   pBMIH->biSize         = sizeof(BITMAPINFOHEADER);
   pBMIH->biWidth        = m_iWidth;
   pBMIH->biHeight       = m_iHeight;
   pBMIH->biPlanes       = 1;
   pBMIH->biBitCount     = 32 ;
   pBMIH->biCompression  = BI_RGB ;

   //
   // Create the new 32-bpp DIB section.
   //
   CDC dc;
   dc.CreateCompatibleDC(NULL);
   BYTE* pBits ;
   HBITMAP hbmBuffer = CreateDIBSection( dc.GetSafeHdc(),
                           (BITMAPINFO*) pBMIH,
                                         DIB_RGB_COLORS,
                               (VOID **) &pBits,
                                         NULL,
                                         0);
   // Select DIB into DC.
   HBITMAP hbmOld = (HBITMAP)::SelectObject(dc.GetSafeHdc(), hbmBuffer);

   // Blt the Windows DIB into our new DIB.
   dc.SelectPalette(&aPalSrc,0) ;
   dc.RealizePalette() ;
   aDib.Draw(&dc,0,0) ;
   GdiFlush() ;

   //
   // Copy the bits out of the DIB section.
   // Change from BGR to RGB.
   //
   int iImageSize = m_iWidth * m_iHeight * sizeof(CGLRGBTRIPLE) ;
   m_pBits = malloc(iImageSize) ;

   RGBQUAD* pSrc = (RGBQUAD*)pBits ;
   CGLRGBTRIPLE* pDest = (CGLRGBTRIPLE*) m_pBits ;
   for (int i = 0 ; i < m_iWidth*m_iHeight ; i++)
   {
      pDest->rgbRed = pSrc->rgbRed ;
      pDest->rgbGreen = pSrc->rgbGreen ;
      pDest->rgbBlue = pSrc->rgbBlue ;
      pDest++ ;
      pSrc++ ;
   }

   //
   // Get rid of all the GDI stuff.
   //
   if (hbmOld)
        (HBITMAP)::SelectObject(dc.GetSafeHdc(), hbmOld);

   DeleteObject(hbmBuffer) ;
}
|
There are billions and billions of other
combinations you can choose from, but now you get
the picture.
CGLImage
Dale Rogerson has encapsulated the code for
translating Windows DIBs to OpenGL images in the
CGLImage class, which is in the GLlib
dynamic-link library (DLL). After CGLImage
loads the DIB with Nigel's CDIB class, it
translates the DIB.
The following example shows how to translate a
DIB using the do-it-yourself method:
anImage.Load("MD500D.BMP", TRANS_DIY) ;
The following example shows how to translate a
DIB using the GDI method:
anImage.Load("MD500D.BMP", TRANS_GDI) ;
The last two examples load an image and convert
it using the partial GDI method:
CGLImage anImage ;
anImage.Load("MD500D.BMP") ;

anImage.Load("MD500D.BMP", TRANS_BOTH) ;
The only other member function currently included
in CGLImage is DrawPixels, which
conveniently calls glDrawPixels:
void
CGLImage::DrawPixels(CGL* pGL)
{
ASSERT((m_iWidth != 0) && (m_iHeight !=0)) ;
ASSERT(m_pBits) ;
pGL->MakeCurrent() ;
GLint iAlign ;
glGetIntegerv(GL_UNPACK_ALIGNMENT, &iAlign) ;
glPixelStorei(GL_UNPACK_ALIGNMENT, 1);
glDrawPixels(m_iWidth, m_iHeight, m_PixelFormat,
GL_UNSIGNED_BYTE, m_pBits) ;
glPixelStorei(GL_UNPACK_ALIGNMENT, iAlign);
} |
Dale Rogerson's EasyDIB sample application calls
CGLImage::Load in CScene::OnInit and
in CSceneVw::OnOptionsLoadBitmap.
CGLImage::DrawPixels is called in
CScene::OnRender.
In his
"OpenGL III: Building an OpenGL C++ Class"
article,
Dale Rogerson explained the value of not
encapsulating the OpenGL functions. He justifies
encapsulating glDrawPixels this way:
- Images are translated differently on
different systems. Encapsulating glDrawPixels
simplifies the support of multiple systems, thus
enhancing portability. Currently, CGLImage
contains multiple translation functions, which
can easily translate images from the X Window
System or Silicon Graphics to OpenGL.
- The glDrawPixels parameters suggest a
structure. Working with structures is easier
from member functions.
Changes to GLlib
Dale Rogerson modified the GLlib DLL by adding
the CGLImage class. He also changed the
CGL class by modifying CGL::Create and
adding CGL::OnCreate.
CGL::Create and CGL::OnCreate
He changed CGL::Create to take the
PIXELFORMATDESCRIPTOR.dwFlags as a parameter.
This gives the user of the class more control over
the pixel format. Currently, CGL does not
allow you to render OpenGL commands on a bitmap.
Dale Rogerson promised to add this support and
document it in a future article. Not sure that
he has yet...
CGL::Create now makes a call to
CGL::OnCreate after setting up the
PIXELFORMATDESCRIPTOR structure. Applications
that use CGL can set up the CGL
instance either by calling CGL::Create or by
overriding CGL::OnCreate and changing the
pixel format there.
CGL::OnCreate is very similar to the
CWnd::OnPreCreateWindow function in the
Microsoft Foundation Class Library (MFC). The
EasyDIB sample application overrides
CGL::OnCreate in the CScene class.
EasyDIB turns double buffering off in
CScene::OnCreate, so it does not have to
implement CSceneView::OnCreate and make a
call to CGL::Create as EasyCI did. Another
benefit of this arrangement is that it places more
of the OpenGL-oriented code in CScene instead
of spreading it out to CSceneView.
Conclusion
Translating Windows DIBs into a format that
OpenGL can use is not difficult, once you understand
the format that Windows uses and the format that
OpenGL expects. You might say that it's kind of like
translating English to English.
Bibliography
Sources of Information on OpenGL
Crain, Dennis.
"Windows NT OpenGL: Getting Started." April
1994. (MSDN Library, Technical Articles)
Neider, Jackie, Tom Davis, and Mason Woo.
OpenGL Programming Guide: The Official Guide to
Learning OpenGL, Release 1. Reading, MA:
Addison-Wesley, 1993. ISBN 0-201-63274-8. (This book
is also known as the "Red Book".)
OpenGL Architecture Review Board. OpenGL
Reference Manual: The Official Reference Document
for OpenGL, Release 1. Reading, MA:
Addison-Wesley, 1992. ISBN 0-201-63276-4. (This book
is also known as the "Blue Book".)
Prosise, Jeff. "Advanced 3-D Graphics for Windows
NT 3.5: Introducing the OpenGL Interface, Part I."
Microsoft Systems Journal 9 (October 1994).
(MSDN Library Archive Edition, Library, Books and
Periodicals)
Prosise, Jeff. "Advanced 3-D Graphics for Windows
NT 3.5: The OpenGL Interface, Part II." Microsoft
Systems Journal 9 (November 1994). (MSDN Library
Archive Edition, Books and Periodicals)
Prosise, Jeff. "Understanding Modelview
Transformations in OpenGL for Windows NT."
Microsoft Systems Journal 10 (February 1995).
Rogerson, Dale.
"OpenGL I: Quick Start.". December 1994. (MSDN
Library, Technical Articles)
Rogerson, Dale.
"OpenGL II: Windows Palettes in RGBA Mode".
December 1994. (MSDN Library, Technical Articles)
Rogerson, Dale.
"OpenGL III: Building an OpenGL C++ Class."
January 1995. (MSDN Library, Technical Articles)
Rogerson, Dale.
"OpenGL IV: Color Index Mode." January 1995.
(MSDN Library, Technical Articles)
Rogerson, Dale.
"OpenGL VI: Rendering on DIBs with
PFD_DRAW_TO_BITMAP." April 1995. (MSDN Library,
Technical Articles)
Rogerson, Dale.
"OpenGL VII: Scratching the Surface of Texture
Mapping." May 1995. (MSDN Library, Technical
Articles)
Microsoft Win32 Software Development Kit (SDK)
for Windows NT 3.5 OpenGL Programmer's Reference.
Sources of Information on DIBs
Gery, Ron.
"DIBs and Their Use.". March 1992. (MSDN
Library, Technical Articles)
Gery, Ron.
"Using DIBs with Palettes." March 1992. (MSDN
Library, Technical Articles)
Microsoft Win32 Software Development Kit (SDK)
for Windows NT 3.5 Video for Windows
Rodent, Herman. "16- and 32-Bit-Per-Pixel DIB
Formats for Windows: The Color of Things to Come."
January 1993. (MSDN Library Archive, Technical
Articles)
Thompson, Nigel.
Animation Techniques for Win32. Redmond, WA:
Microsoft Press, 1995.