Tour 4: A Bestiary of Quadrilaterals
The Sketchpad applet below was built using the Custom Tool square
that is built in this tour. Every line segment is part of a square
that was build using verices of preexisting squares. One vertex of the
great grandparent was fixed to and animated around a circle. All
the children follow the animation. Try clicking the Animate button
and then again to stop it. Find one of the central verices that will
rescale the diagram when you drag it and then animate again.
Ideas in this Tour:
- How to navigate through a multipage document.
- Hiding and unhiding objects.
- Exploring a constructions using the Objects Properties dialog box.
- Adding pages to a document.
- Building a custom tool from constructions, and using these tools.
Navigating a Multi-page Document
1.
Open
Quadrilaterals.gsp from the
This document is called a multi-page document because it
contains several “pages,” just as many web sites contain many related pages. Think of it as a sketchbook for collecting
related sketches.
2.
Navigate through the sketch book using the link buttons
labeled “back to TOC,” etc. and the page tables at the bottom of the
window. Use the Arrow tool to push
buttons.
Exploring
the Constructions
Try the following:
3.
Go to the Isosceles Trapezoid page and drag point L.
What is the relationship between points
L and K?
What makes this trapezoid isosceles?
4.
On the Rectangle page, drag points E, H and G on the rectangle (one at a time.)
How does the rectangle behave when each
of these points is dragged?
5.
On the parallelogram page drag segments MN and NO (one at a time), keeping an eye on the measurements underneath.
What do you notice about angles and
lengths in a parallelogram?
6.
Experiment with dragging other points and
segments. If any page gets too messy,
press Undo repeatedly.
So, why do the quadrilaterals in our bestiary behave the way they do? What holds the rectangle together? What symmetries are work behind the controlling structures of various constructions? This Tour is designed to help you gain some understanding of the answers to these questions for more complicated sketches.
7.
From the Isosceles Trapezoid page choose Show All Hidden from the Display
menu. Midpoint X of segment IJ and
perpendicular bisector m through X should now be visible. Experiment with dragging various parts of the
sketch about. Can you predict the
behavior of drag before dragging?
|
8.
Deselect all other objects except line m and right click on m to choose “properties” and produce a dialog box as shown here: |
|
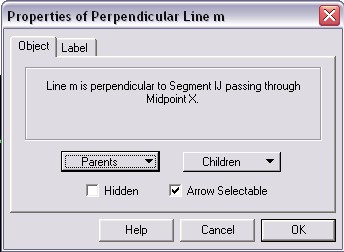
9.
Move the Properties dialog box out of the way by
dragging its title bar, press the Parents pop-up menu and choose items (point
X and segment IJ). Choose one of IJ’s
parents and continue navigating children and parents in the “family tree” to
see how things are laid out.
Adding
a Page to the Document
Here we’ll add and build a new page called square, with the
basic construct for a building an invariant square.
10.
Click somewhere in Quadrilaterals.gsp to make it the active document.
11.
On
the Document Options from the File
menu press the Add Page button and
then choose Blank Page from the popup menu.
Title the page Square and press OK.
12. Now build the square by
§ Construct a circle and then a congruent circle centered on the circumference of the first circle by dragging the second circle’s circumference to the center of the first circle.
§ Draw a line segment connecting the circles’ centers.
§ Deselect all then select the line segment and its endpoints (clicking on each in turn) and then choose Perpendiculars from the Construct menu.
§ Deselect all and then for each circle, select the circle and the perpendicular line through its center and choose Intersections from the Construct menu (or simply ctrl+I).
§
Hide everything (select and ctrl+H) except the
four vertices of the square whose edges are circle radii and construct
additional segments, as necessary, to complete the square.
If you need to construct more squares, this long process
could become tedious. Almost any
construction like this can be made into a “custom tool,” available from the
Toolbox.
13.
With
the Arrow tool on the Square page choose select all from the edit page (or
ctrl+A.)
14.
Choose
the Create New Tool option from the
Custom Tools menu in the Toolbox. Enter
the name Square and click OK. This will
add the tool named Square to the “This Document” section of the Custom Tools
menu.
15.
Experiment
using the tool to draw some squares using various vertices of old squares, say,
to construct new ones. If you don’t like
how it turned out try ctrl+z to undo a command.
Pay attention to how the square opens out. Try dragging one of Adam or Eve (the original
parents) to see how the rest of the construction follows. Go crazy!
|
|
|
